OpenLayersを使ってみる。[Chapter 52]
OpenLayersのStyleMap classについて-2[Chapter 51] に引き続き、OpenLayersのStyleMapのAttribute replacementについて基本を学んでいきます。
この章以降は、
-
いかにOpenLayersのVector layerのstyleを表示するか?
-
Style classをその使い方について → 今回もここ
-
Rule classの使い方
-
Filter classの使い方
について順番に学んでいきます。
OpenLayers 2.10 Beginner's Guideなる書籍の章立てにあわせて、OpenLayersの使い方を学んでいきます。
Attribute replacement
容易であるが強力なものとして、feature styleのAttribute replacementと言うものがあります。
それは、変数のように、layerのstyle定義の中でfeatureのattribueを使用する方法です。
symbolizerを作成する場合、次のformatで任意のpropertyの値をセットすることができます:
${variable_name}
variable_nameがあるところに、featureに含まれていたpropertyの名前はpropertyに帰着します。
例えば、featureがすべて任意の整数値を備えた「size」と呼ばれる属性特性を持っているとしましょう。
もし各featureのsize propertyにpointRadiusをセットしたければ、次のように使用します:
{ 'pointRadius': ${size} }
そのとき起こるのは、featureがそれぞれデザインされる場合、${size}がfeatureのattribute.size property(1つが存在する場合)と置き換わるということです。
Attribute replacementを使ったexample code
Attribute replacementを使った簡単なexample codeを作成してみましょう。以下のcodeを入力します。
保存先は、c:¥ms4w¥apache¥htdocs¥openlayer¥chapter10¥にしておきます。
ファイル名は、chapter10_ex3_attriute_replacement.htmlで保存します。
[html]
<!DOCTYPE html>
<html lang=’ja’>
<head>
<meta charset=’utf-8′ />
<script type=’text/javascript’ src=’http://localhost/openlayers/OpenLayers.js’></script>
<script type=’text/javascript’>
var map;
var vector_layer;
function init() {
//Create a map with an empty array of controls
map = new OpenLayers.Map(‘map_element’);
//Create a base layer
var wms_layer = new OpenLayers.Layer.WMS(‘OpenLayers WMS’,
‘http://vmap0.tiles.osgeo.org/wms/vmap0′, {
layers : ‘basic’
}, {});
map.addLayer(wms_layer);
//Add vector layer
vector_layer = new OpenLayers.Layer.Vector(‘Basic Vector Layer’);
map.addLayer(vector_layer);
//Create some points
for (var i = 0; i < 10; i++) {
vector_layer.addFeatures([
new OpenLayers.Feature.Vector(
new OpenLayers.Geometry.Point(
(Math.floor(Math.random() * 360) - 180),
(Math.floor(Math.random() * 180) - 90)), {
//Attributes go here
size : 5 + (Math.floor(Math.random() * 20)),
label : 'F' + i,
strokeWidth : (Math.floor(Math.random() * 10))
})]);
}
//Create a style object to be used by a StyleMap object
var vector_style = new OpenLayers.Style({
‘cursor’ : ‘pointer’,
‘fillColor’ : ‘#787878′,
‘fillOpacity’ : .8,
‘fontColor’ : ‘#343434′,
‘label’ : ‘${label}’,
‘pointRadius’ : ‘${size}’,
‘strokeColor’ : ‘#232323′,
‘strokeDashstyle’ : ‘solid’,
‘strokeWidth’ : ‘${strokeWidth}’
});
//create a select style
var vector_style_select = new OpenLayers.Style({
‘fillColor’ : ‘#ffffff’,
‘fillOpacity’ : .9,
‘label’ : ‘X’,
‘pointRadius’ : 16,
‘strokeColor’ : ‘#343434′,
‘strokeDashstyle’ : ‘solid’,
‘strokeWidth’ : 4
});
//Create a style map object and set the ‘default’ intent to the
// style object we just created
var vector_style_map = new OpenLayers.StyleMap({
‘default’ : vector_style,
‘select’ : vector_style_select
});
//Add the style map to the vector layer
vector_layer.styleMap = vector_style_map;
//Add a select feature control
var select_feature_control = new OpenLayers.Control.SelectFeature(vector_layer);
map.addControl(select_feature_control);
//Activate the control
select_feature_control.activate();
if (!map.getCenter()) {
map.zoomToMaxExtent();
}
}
</script>
</head>
<body onload=’init();’>
<div id=’map_element’ style=’width: 600px; height: 600px;’></div>
</body>
</html>
[/html]
codeでまずは、map objectを作成します。
        //Create a map with an empty array of controls
        map = new OpenLayers.Map('map_element');

        //Create a base layer
        var wms_layer = new OpenLayers.Layer.WMS(
            'OpenLayers WMS',
            'http://vmap0.tiles.osgeo.org/wms/vmap0',
            {layers: 'basic'},
            {}
        );
        map.addLayer(wms_layer);
WMS layerをbase layerとして作成します。
次に、vector layerを追加します。
//Add vector layer
vector_layer = new OpenLayers.Layer.Vector('Basic Vector Layer');
map.addLayer(vector_layer);

//Create some points
for (var i = 0; i < 10; i++) {
	vector_layer.addFeatures([
		new OpenLayers.Feature.Vector(
			new OpenLayers.Geometry.Point(
				(Math.floor(Math.random() * 360) - 180),
				(Math.floor(Math.random() * 180) - 90)), {
		//Attributes go here
		size : 5 + (Math.floor(Math.random() * 20)),
		label : 'F' + i,
		strokeWidth : (Math.floor(Math.random() * 10))
	})]);
}
のように vector_layerを定義します。
Pointの座標はrandamに10カ所を作成するようにして、addFeaturesでvector_layerに追加します。
Attributeにsize、label、strokeWidthを設定します。
そして、StyleMap objectを
//Create a style object to be used by a StyleMap object
var vector_style = new OpenLayers.Style({
	'cursor' : 'pointer',
	'fillColor' : '#787878',
	'fillOpacity' : .8,
	'fontColor' : '#343434',
	'label' : '${label}',
	'pointRadius' : '${size}',
	'strokeColor' : '#232323',
	'strokeDashstyle' : 'solid',
	'strokeWidth' : '${strokeWidth}'
});

//create a select style
var vector_style_select = new OpenLayers.Style({
	'fillColor' : '#ffffff',
	'fillOpacity' : .9,
	'label' : 'X',
	'pointRadius' : 16,
	'strokeColor' : '#343434',
	'strokeDashstyle' : 'solid',
	'strokeWidth' : 4
});
のようにvector_style(未選択状態)とvector_style_select(選択状態)を定義します。
defualt状態の'label' : '${label}'、'pointRadius' : '${size}'、'strokeWidth' : '${strokeWidth}'をattributeの値に置き換えます。
そして、vector_style_mapに、
//Create a style map object and set the 'default' intent to the
//  style object we just created
var vector_style_map = new OpenLayers.StyleMap({
	'default' : vector_style,
	'select' : vector_style_select
});

//Add the style map to the vector layer
vector_layer.styleMap = vector_style_map;
StyleMapを作成します。ここで、'default': vector_style、'select' : vector_style_selectとしてstyleMapとします。
そして、vector layerをvector_layer.styleMapとして作成します。
最後に、controlを追加して、activateします。
//Add a select feature control
var select_feature_control = new OpenLayers.Control.SelectFeature(vector_layer);
map.addControl(select_feature_control);

//Activate the control
select_feature_control.activate();
保存後、FireFoxを立ち上げて、http://localhost/openlayers/chapter10/chapter10_ex3_attriute_replacement.htmlと入力すると、

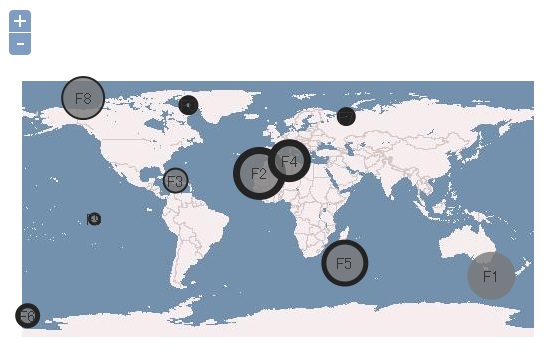
ように'default'のStyleMapで定義されたvactor layerが追加されて、point dataが読み込まれてmapに表示されます。attibuteがcircle内に表示されます。
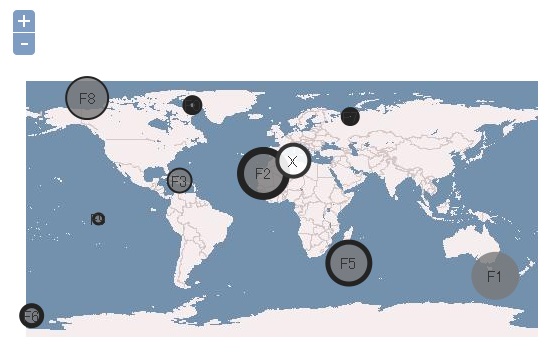
ように'select'のStyleMapで定義されたcircle featureに変わります。
今回のまとめ
OpenLayersの簡単なStyleMapのAttribute replacementについて基本を学びました。
是非、attributeの値をいろいろと変更して、replacementについて学んでみましょう。
次回も、StyleMap classのRuleとfilerについて基本を学んでいきます。
また、本tutorialは、htmlやCSSやJavaScriptの基本的なことはある程度理解している前提で今後も話を進めていきます。また、誤字、脱字、spell間違いや勘違いも多々出てくると考えられます。
それは違うじゃん!!とかいろんな意見をいただければと思います。
そこんところ ヨロシク~~!!


最近のコメント