MapWindowのPlugin作成 [Chapter 2]
今回は、MapWindowのPluginにもsampleとして公開されているSample MapWindow Plug-in Project: Path AnalyzerをMapWindow4.8.6で使えるように、若干手直しします。
Path Analyzer Pluginの機能は、ラスターデータの標高をLineデータに沿ってグラフ化するもので、河川の距離と標高データや道路の距離と標高データを作成する場合に使えます。
Path Analyzer PluginのDownload
まずは、Sample MapWindow Plug-in Project: Path Analyzerをダウンロードして、解凍します。
Templateはvb2005ですが、vb2010でも変換して使うことができます。
Plugin機能追加に必要なもの
変換したvb2010のmwPathAnalyzer Pluginを開いてみます。
まずは、mwPathAnalyzer Pluginの参照は古いので、新しく参照設定を変更します。
-
MapWinGIS.ocx
-
MapWinInterface.dll
-
MapWinGeoProc.dll
-
NPlot.dll (ダウンロードしたmwPathAnalyzerに含まれる)
をC:¥program files¥MapWindow¥にあるものに置き換えます。
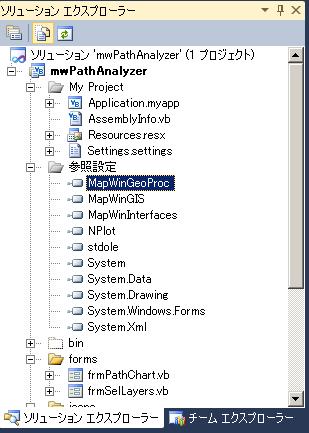
mwPathAnalyzer Pluginのソリューションエクスプローラ
ここでは、DefaultでC:¥program files¥MapWindowにMapWindow.exeがinstallされていることを前提として話を進めます。
一度、保存します。
ここで早速実行したいところですが、Pluginで作成されるdllの保存場所を変更します。
MapWindowのpluginを実行させる場合、必ずC:¥program files¥MapWindow¥Plugins内にpluginがなければなりません。
したがって、¥mwPathフォルダーに出力されるように、DebugとReleaseの出力先を変更します。
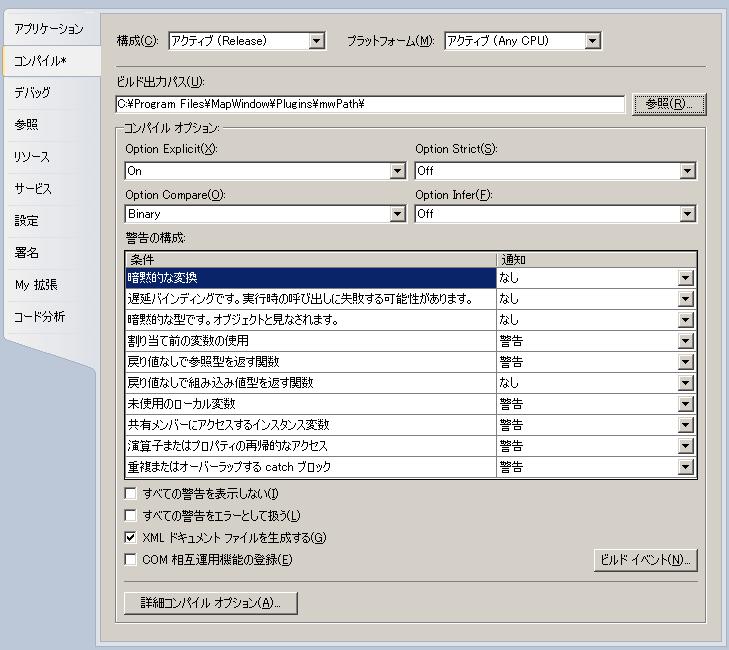
mwPathAnalyzer Pluginの保存場所の変更
また、Debug時には、dll単体では動かないので、MapWindows.exeを起動させてDebugするように変更します。
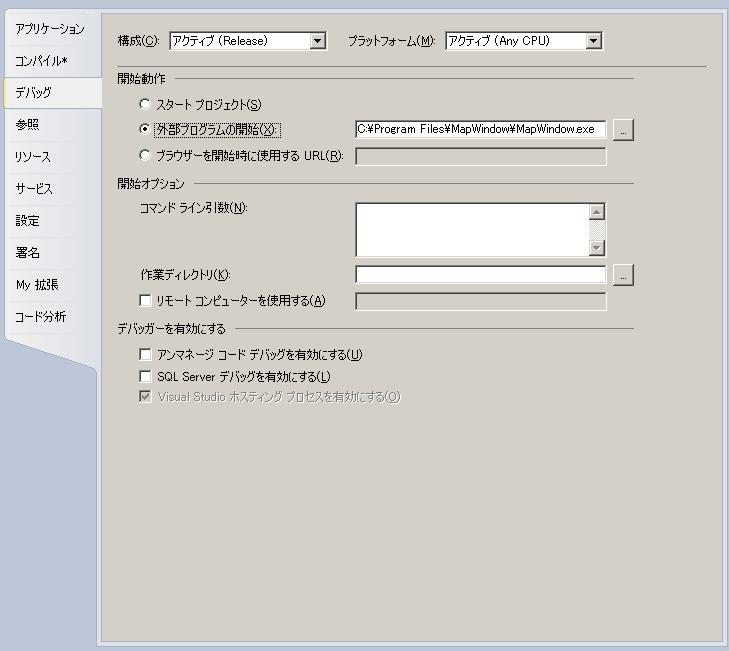
デバッグの変更
最後に、コンパイル→詳細コンパイルオプションを変更します。
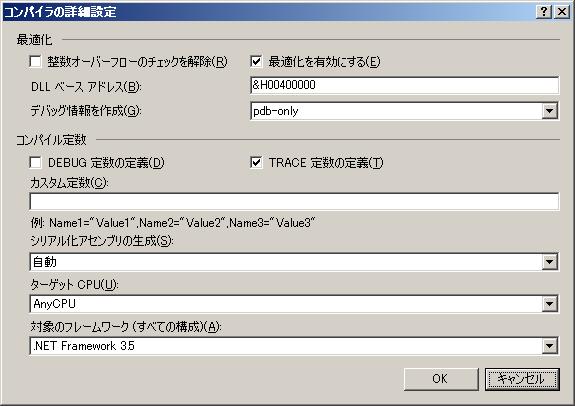
デバッグの変更
一度保存して、ビルドします。
次に、Debug実行すると、MapWindows.exeが起動します。
その後、メニューのプラグインをクリックすると
こんな感じで
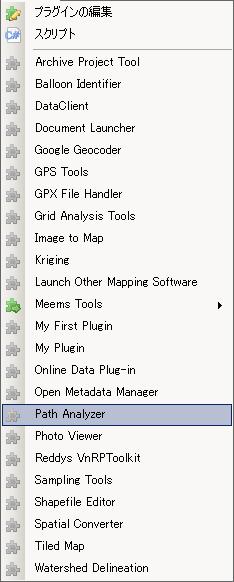
mwPathAnalyzer Pluginがメニューに表示されています。
mwPathAnalyzer Pluginを選択すると、メニューバーにこんな感じで

MmwPathAnalyzer Pluginがメニューバーに表示されています。
PluginのCode
mwPathAnalyzerInterface.vbにPluginのInterfaceが定義されています。
codeを見てみると
Initializeでメニューの作成を行い、Terminateでメニューの削除を行います。
    'Runs on load of the plugin, used primarily to load menu and toolbar items
    Public Sub Initialize(ByVal MapWin As MapWindow.Interfaces.IMapWin,
                          ByVal ParentHandle As Integer) Implements MapWindow.Interfaces.IPlugin.Initialize
        Dim nil As Object
        nil = Nothing

        'Mapwin is the link to the mapwindow interface, used for manipulating layers, selected components, tool being used, and status/progress bar
        g_mapWin = MapWin

        'Add menus with a unique name.
        With g_mapWin.Menus
            .AddMenu("pamMain", nil, "Path Analyzer")
            .AddMenu("pamSelectLayer", "pamMain", nil, "Select Layers")
            .AddMenu("pamAnalyzePath", "pamMain", nil, "Open Path Analyzer")
            .AddMenu("pamSeparator", "pamMain", nil, "-")
            .AddMenu("pamDrawShape", "pamMain", nil, "Draw New Paths")
            .AddMenu("pamDelShape", "pamMain", nil, "Delete Selected Path")
        End With


        'Create New toolbar
        MapWin.Toolbar.AddToolbar("PathAnalyzer")

        'Add icons by creating an icon from a bitmap object and adding to the mapwin toolbar
        Dim bt As New System.Drawing.Bitmap(Me.GetType(), "analyze_16.ico")
        Dim ico As System.Drawing.Icon = System.Drawing.Icon.FromHandle(bt.GetHicon)
        'Dim tlbButton As MapWindow.Interfaces.ToolbarButton = MapWin.Toolbar.AddButton("PathInfo", ico, "")
        Dim tlbButton As MapWindow.Interfaces.ToolbarButton = MapWin.Toolbar.AddButton("PathInfo", "PathAnalyzer", "", "")
        tlbButton.Tooltip = "Path Analyzer Tool"
        tlbButton.Picture = ico

        bt = New System.Drawing.Bitmap(Me.GetType(), "pencil.ico")
        ico = System.Drawing.Icon.FromHandle(bt.GetHicon)
        'tlbButton = MapWin.Toolbar.AddButton("DrawPath", ico, "")
        tlbButton = MapWin.Toolbar.AddButton("DrawPath", "PathAnalyzer", "", "")
        tlbButton.Picture = ico
        tlbButton.Tooltip = "Draw New Path"

        bt = New System.Drawing.Bitmap(Me.GetType(), "Delete_all_16.ico")
        ico = System.Drawing.Icon.FromHandle(bt.GetHicon)
        'tlbButton = MapWin.Toolbar.AddButton("DeletePath", ico, "")
        tlbButton = MapWin.Toolbar.AddButton("DeletePath", "PathAnalyzer", "", "")
        tlbButton.Picture = ico
        tlbButton.Tooltip = "Delete Selected Path"
    End Sub

    'Runs on unloading the plugin, used primarily to unload menu and toolbar items
    Public Sub Terminate() Implements MapWindow.Interfaces.IPlugin.Terminate
        With g_mapWin.Menus
            .Remove("pamMain")
            .Remove("pamSelectLayer")
            .Remove("pamAnalyzePath")
            .Remove("pamSeparator")
            .Remove("pamDrawShape")
            .Remove("pamDelShape")
        End With
        g_mapWin.Toolbar.RemoveButton("PathInfo")
        g_mapWin.Toolbar.RemoveButton("DrawPath")
        g_mapWin.Toolbar.RemoveButton("DeletePath")
        g_mapWin.Toolbar.RemoveToolbar("PathAnalyzer")
    End Sub
その他のメニューのeventはPlugin Codeを見て下さい。
それほど、難しいcodeはないので、理解できると思います。
Path Analyzer Pluginの実行
それでは、mwPathAnalyzerを実行してみましょう。
このPluginの注意点ですが、ラスターデータは平面直角座標系でなければ、うまく標高を描画できません。
ここで使用しているデータのsampleを
においておきますので、Pluginのチェックに使用して下さい。
まず、Path Analyzer→Select LayersでラスターデータとLineデータを選択します。
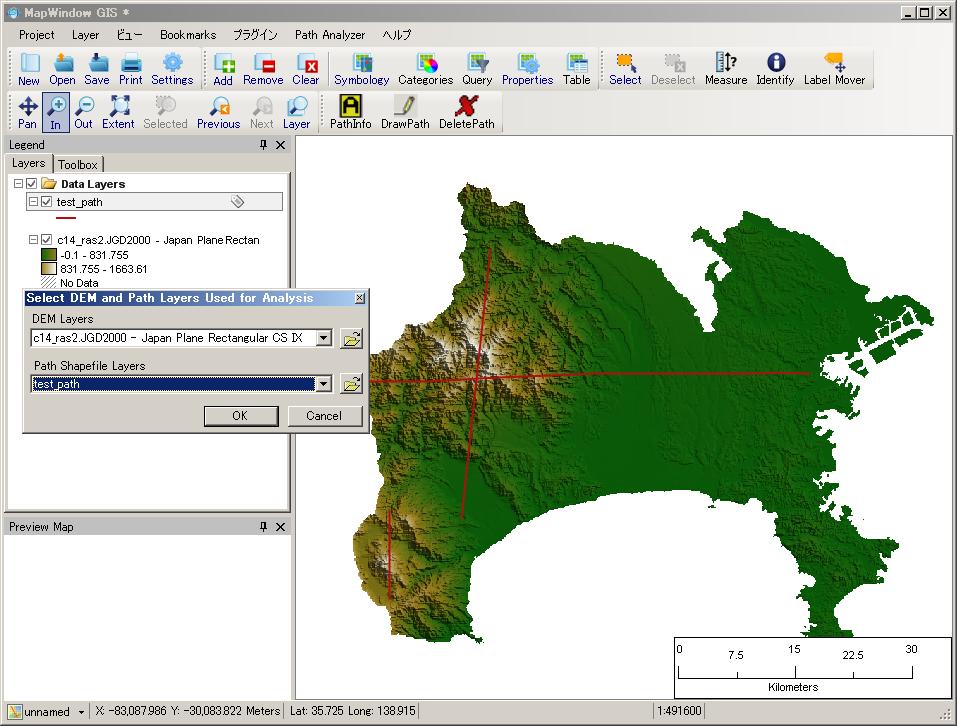
Path Analyzer→Select LayersでラスターデータとLineデータを選択
次に、メニューからPathInfoを選択します。
そしてLineデータを選択すると、
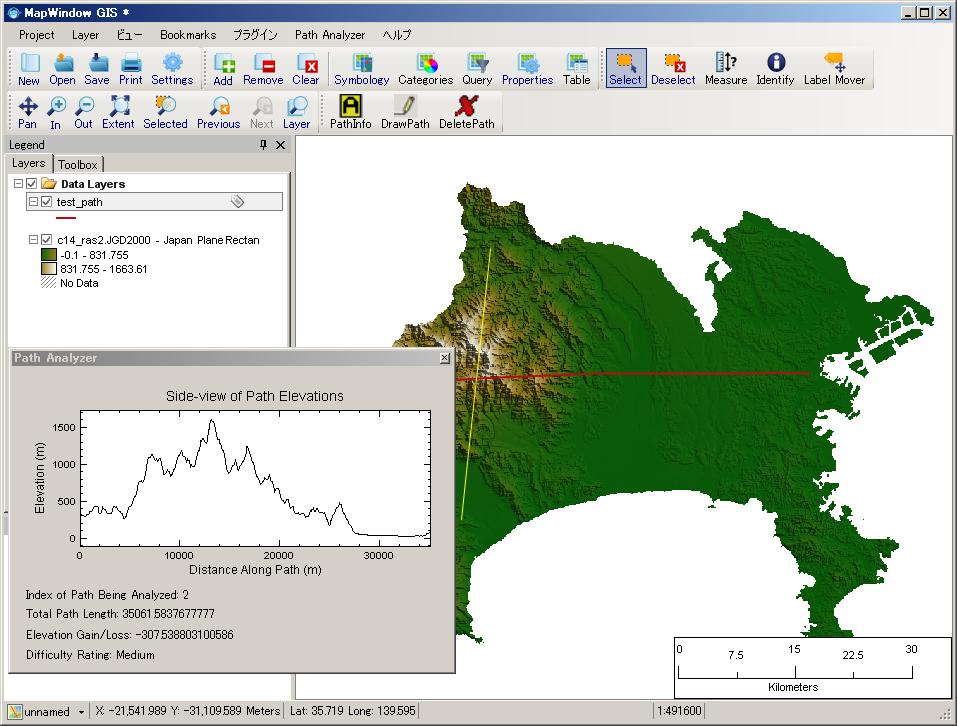
Path Analyzer結果
メニュー項目の
-
DrawPathでLineの追加
-
DeletePathでLineの削除
が行えます。
いろいろとtryして下さい。
今回のまとめ
-
PluginメニューにmwPathAnalyzer Pluginを追加しました。
このサンプルを拡張して、距離と標高データを出力するように機能追加すると十分に使えそうです。
MapWindowのPluginを作成することで、カスタマイズが簡単になります。また、MapWinGISでのCodingとほぼ同じように扱えるので、開発は比較的簡単にできます。
vb.net2010だけでなく、C#でも、visual studio2008でも動作することができます。

最近のコメント