PythonでShapely geometriesを使ってみる[Chapter 15]
PythonでGeoSpatial Dataの表示と保存_2[Chapter 14] に引き続き、Shapely libraryの使用の基本を学んでおきます。
本tutorialは、Python Geospatial Developmentを参考にして、実践的に使えるPythonでGeoSpatialの使い方を学んでいくものです。
また、本Blog中のsource code等に関しては、あくまでも参考としてください。なにがあっても責任とれませんので。
そこんところ、ヨロシク~~!!
準備
PythonでGeoSpatial Dataの読み書きについて_1[Chapter 8] でPythonとGeoSpatialに関するlibraryが設定できているもとして進めていきます。
Shapely geometriesを使う
Shapelyは、地理空間データ上で様々な計算を行なうための非常に有能なlibraryです。
そのlibraryの能力は、複雑で現実世界の問題を解決します。
ここでは、example codeを試してみましょう。
Sample data
書籍と同様にsample dataはUSA CAのShapefileと公園の位置データを使います。
例題は、「USA CA州の都市域に近いまたは都市域にある公園を見分けるために、shapelyを使う」というものです。
本当ならば、日本のデータで例題をやりたいところですが。
-
http://census.gov/geo/www/tigerからShapefileを取得します。
-
Click on the 2009 TIGER/Line Shapefiles Main Page link, then follow the Download the 2009 TIGER/Line Shapefiles now link.
-
Choose California from the pop-up menu on the right, and click on Submit. A list of the California Shapefiles will be displayed; the Shapefile you want is labelled Metropolitan/Micropolitan Statistical Area. Click on this link, and you will download a file named tl_2009_06_cbsa.zip. Once the file has downloaded, uncompress it and place the resulting Shapefile into a convenient location so that you can work with it.
-
You now need to download the GNIS placename data for California. Go to the GNIS website:http://geonames.usgs.gov/domestic
-
Click on the Download Domestic Names hyperlink, and then choose California from the pop-up menu. You will be prompted to save the CA_Features_XXX.zip file. Do so, then decompress it and place the resulting CA_Features_XXX.txt file into a convenient place.
今回使用するfileは
http://geonames.usgs.gov/docs/stategaz/CA_Features_20130602.zip
http://www2.census.gov/geo/tiger/2013CBSA/CBSAs_Feb2013_delineation.zip
の2つになります。
これらをそれぞれ解凍して、私の開発環境では、shapefileはf:¥shapefile_data¥tl_2009_06_cbsa¥のfolderを作成して、解凍したfileをcopyして、text fileは、f:¥CA_Features_20130602¥のfolderを作成して、解凍したfileをcopyしておきます。
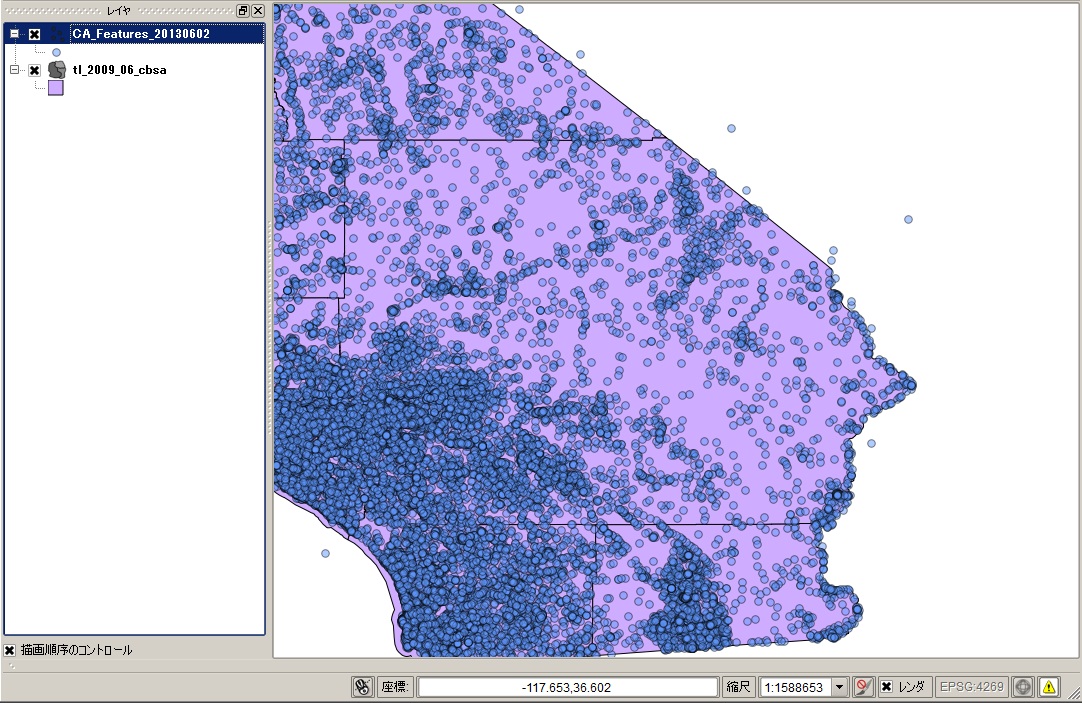
QGISでshapefileとtest dataの確認すると、

な感じで表示されます。これでsample dataはOKです。
都市域に近いまたは都市域にある公園を見分ける code
とりあえず、Ediorで下記のcodeを入力して、保存します。
保存先はf:¥python_example¥chapter_5¥ folderにfindNearbyParks.pyで保存します。
[python]
# findNearbyParks.py
import osgeo.ogr
import shapely.geometry
import shapely.wkt
MAX_DISTANCE = 0.1 # Angular distance; approx 10 km.
print "Loading urban areas…"
urbanAreas = {} # Maps area name to Shapely polygon.
inPath = "f:¥¥shapefile_data¥¥tl_2009_06_cbsa¥¥tl_2009_06_cbsa.shp"
shapefile = osgeo.ogr.Open(inPath)
layer = shapefile.GetLayer(0)
for i in range(layer.GetFeatureCount()):
feature = layer.GetFeature(i)
name = feature.GetField("NAME")
geometry = feature.GetGeometryRef()
shape = shapely.wkt.loads(geometry.ExportToWkt())
dilatedShape = shape.buffer(MAX_DISTANCE)
urbanAreas[name] = dilatedShape
print "Checking parks…"
f = file("f:¥¥CA_Features_20130602¥¥CA_Features_20130602.txt", "r")
for line in f.readlines():
chunks = line.rstrip().split("|")
if chunks[2] == "Park":
parkName = chunks[1]
latitude = float(chunks[9])
longitude = float(chunks[10])
pt = shapely.geometry.Point(longitude, latitude)
for urbanName,urbanArea in urbanAreas.items():
if urbanArea.contains(pt):
print parkName + " is in or near " + urbanName
f.close()
[/python]
注意)上記codeで¥は全角ですので、半角にするかもしくは、バックスラッシュに置き換えてください。
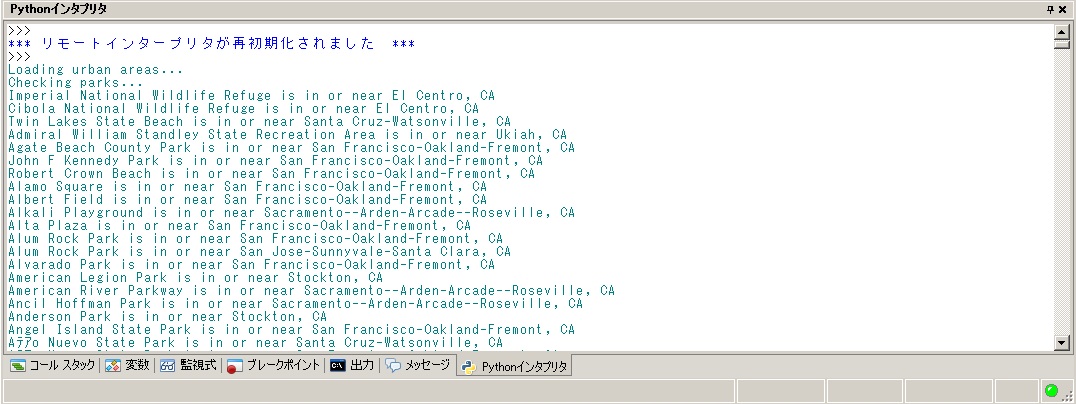
PyScriptでrunすると、python インタプリタに、

でずらずらと公園と公園のある都市域が表示されます。
codeの説明
findNearbyParks.pyが何を行っているのかを順にみていきましょう。
1.library 読み込み
import osgeo.ogr import shapely.geometry import shapely.wkt
shapely libraryのgeometryとwktを使います。
2.変数とlistの定義
MAX_DISTANCE = 0.1 # Angular distance; approx 10 km.

urbanAreas = {} # Maps area name to Shapely polygon.
公園を探し出す距離を、polygonから10kmとします。
3.入力Shapefileのopen
inPath = "f:¥¥shapefile_data¥¥tl_2009_06_cbsa¥¥tl_2009_06_cbsa.shp"
shapefile = osgeo.ogr.Open(inPath)
layer = shapefile.GetLayer(0)
Shapefileのlayerはただ一つのlayerですから、GetLayer(0)となります。
4.urbanAreasごとのbuffer作成
for i in range(layer.GetFeatureCount()):
    feature = layer.GetFeature(i)
    name = feature.GetField("NAME")
    geometry = feature.GetGeometryRef()
    shape = shapely.wkt.loads(geometry.ExportToWkt())
    dilatedShape = shape.buffer(MAX_DISTANCE)
    urbanAreas[name] = dilatedShape
GetFeatureCountでloopして、shapefileをwktで読み込んで、10kmのbufferを作成します。
5.polygon buffer内に含まれる公園の抽出
f = file("f:CA_Features_20130602CA_Features_20130602.txt", "r")
for line in f.readlines():
    chunks = line.rstrip().split("|")
    if chunks[2] == "Park":
        parkName = chunks[1]
        latitude = float(chunks[9])
        longitude = float(chunks[10])

        pt = shapely.geometry.Point(longitude, latitude)

        for urbanName,urbanArea in urbanAreas.items():
            if urbanArea.contains(pt):
                print parkName + " is in or near " + urbanName
text fileを順番に読んでf.readlines()で最後まで読みます。
chunksにparkと緯度経度データを追加して、pt objectをshapely.geometry.Pointで作成します。
urbanName,urbanAreaでpolygon数でloopして、if urbanArea.contains(pt)でurbanArea内に含まれるptがあれば出力します。
順番にみていくと理解できると思います。
6.
ここで10km以内にある公園を見つけ出す方法ですが、2つの方法があります。
-
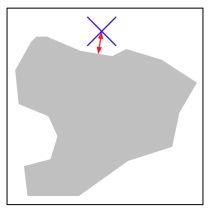
shapeとpointの間の距離をshape.distance()を使う方法です。イメージとしては下図のようなものです。
-
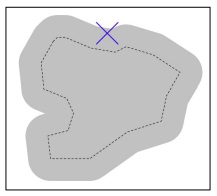
あらかじめshapeのbufferを作成して、その中に含まれる公園見つけ出す方法です。イメージとしては下図のようなものです。ここでは、この方法を使いました。
注意点)今回の角距離(angular distance)を求める際には、平面直角座標系として求めなければ正確な距離は出ません。ここでは、およそ10kmとしてbufferを生成させてその中に含まれる公園を抽出しています。
今回のまとめ
今回は、PythonでのGeoSpatial dataのShapely geometriesの使い方を学びました。でShapely libraryは機能が非常に豊富ですので、ぜひ、pypi – shapelyで自習することをお勧めします。
次回は、pyproj libraryを使って距離と単位について学びます。
また、本tutorialは、Python Scriptの基本的なことはある程度理解している前提で今後も話を進めていきます。また、誤字、脱字、spell間違いや勘違いや翻訳間違いなど多々出てくると考えられます。
それは違うじゃん!!とかいろんな意見をいただければと思います。
そこんところ ヨロシク~~!!


最近のコメント