PythonでProjectionを使ってみる。[Chapter 4]
PythonでGDALをちょろっと使ってみる。[Chapter 3] に引き続き、PythonのProjectionについての基本を学んでおきます。PythonでGeoSpatialをやってみる。[Chapter 1] でPythonとGeoSpatialに関するlibraryが設定できているもとして進めていきます。
本tutorialは、Python Geospatial Developmentを参考にして、実践的に使えるPythonでGeoSpatialの使い方を学んでいくものです。
また、本Blog中のsource code等に関しては、あくまでも参考としてください。なにがあっても責任とれませんので。
そこんところ、ヨロシク~~!!
Projectionとは?
Projectionについては、OpenLayersのProjectionについて[Chapter 11]を参考にしてください。
ここでは、proj4をPythonで使う方法を学んでいきます。
PythonでProjectionを利用する場合、pyproj libraryを使います。pyprojについては、pyproj HPを参考にしてください。
pyprojとは、「PythonでProjection(投影座標系、測地系)を扱うためのlibrary」と言えるでしょうか。
Python Geospatial Developmentによれば、
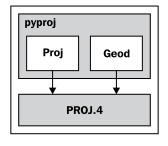
の図のようなobject構成になっています。
以下は、翻訳が正しいのかどうか?不確定なので、とりあえず原文を載せておきます。
proj
Proj is a cartographic transformation class, allowing you to convert geographic coordinates (latitude and longitude values) into cartographic coordinates (x, y values, by default in meters) and vice versa.
When you create a new Proj instance, you specify the projection, datum, and other values used to describe how the projection is to be done. For example, to use the “Transverse Mercator” projection and the WGS84 ellipsoid, you would do the following:
projection = pyproj.Proj(proj='tmerc', ellps='WGS84')
Once you have created a Proj instance, you can use it to convert a latitude and longitude to an (x,y) coordinate using the given projection. You can also use it to do an inverse projection—that is, converting from an (x,y) coordinate back into a latitude and longitude value again.
The helpful transform() function can be used to directly convert coordinates from one projection to another. You simply provide the starting coordinates, the Proj bject that describes the starting coordinates' projection, and the desired ending projection.
This can be very useful when converting coordinates, either singly or en masse.
訳『projは、地図座標変換クラスです。地図座標(メートル単位で、デフォルトでのx、yの値)、およびその逆に地理座標(緯度と経度の値)に変換することができるものです。
新しいprojのインスタンスを作成するときは、投影、測地系と、投影が行う方法を記述するために使用する値を指定します。例えば、”横メルカトル”投影とWGS84楕円体を使用するには、次の操作を行います:
projection = pyproj.Proj(proj='tmerc', ellps='WGS84')
projのインスタンスを作成したら、定義したprojrctionを利用して、(x、y)座標から緯度と経度に変換します。
また、projectionを使用して逆変換もできます。(x、y)が再び緯度と経度の値に戻るように変換します。
transform() は、直接、座標系を別の座標を変換するために使用することができます。
単に開始座標、開始座標のprojectionを記述したprojに渡せば、および希望する最終的なprojectionを提供します。
単独あるいは複数の座標データを変換するとき、これは非常に便利です。』
Geod
Geod is a geodetic computation class that allows you to perform various Great Circle calculations. We looked at Great Circle calculations earlier when considering how to accurately calculate the distance between two points on the Earth's surface. The eod
class, however, can do more than this:
訳『Geodは、さまざまな大圏の計算を実行することができ測地計算クラスです。
正確に地球の表面上の2点間の距離を計算する方法を検討する際に我々は、以前の大圏の計算を行いました。
しかし、Geodのclassは、これ以上の操作を行うことができます。』
Geodのmethod機能としては、
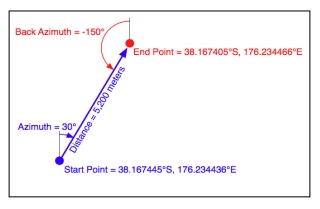
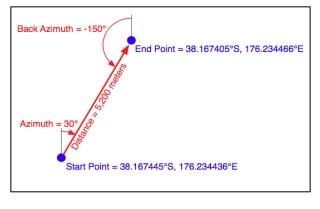
1. The fwd() method takes a starting point, an azimuth (angular direction) and a distance, and returns the ending point and the back azimuth (the angle from the end point back to the start point again):
訳『fwd() methodは、出発点で、方位角(角度方向)と距離をとり、終点と後方方位を返します(始点と終点の後方からの角度に対して)』:
2. The inv() method takes two coordinates and returns the forward and back
azimuth as well as the distance between them:
訳『inv() methodは、2つの座標を取り、前後に方位角と同様、それらの間の距離を返します。』:
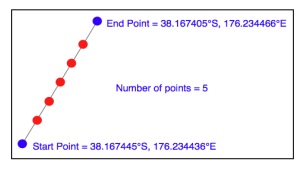
3. The npts() method calculates the coordinates of a number of points spaced
equidistantly along a geodesic line running from the start to the end point:
訳『npts() methodは、開始から終点まで実行測地線に沿って等間隔の点の数の座標を計算します。』:
pyprojのexample code
pyproj Install
まずは、pyproj dowmload listから、使用しているPythonのversionにあわせたinstallerをdownloadします。
ここでは、pyproj-1.9.2.win32-py2.7.exeをdownloadして、installします。
Example code
次に、Ediorで下記のcodeを入力して、保存します。
保存先はf:¥python_example¥chapter_3¥ folderにpyproj-example.pyで保存します。
[python]
import pyproj
UTM_X = 565718.523517
UTM_Y = 3980998.9244
srcProj = pyproj.Proj(proj="utm", zone="11", ellps="clrk66", units="m")
dstProj = pyproj.Proj(proj=’longlat’, ellps=’WGS84′, datum=’WGS84′)
lond,latd = pyproj.transform(srcProj, dstProj, UTM_X, UTM_Y)
print "UTM zone 11 coordinate (%0.4f, %0.4f) = %0.4f, %0.4f" ¥
% (UTM_X, UTM_Y, latd, lond)
angle = 315
distance = 10000
geod = pyproj.Geod(ellps=’clrk66′)
lond2,latd2,invAngle = geod.fwd(lond, latd, angle, distance)
print "————————————————–"
print "%0.4f, %0.4f is 10km northeast of %0.4f, %0.4f" ¥
% (latd2, lond2, latd, lond)
[/python]
注意)上記codeで¥は全角ですので、バックスラッシュに置き換えてください。
9行目と18行目で、Projrctionの変換を行っています。
9行目の、lond,latd = pyproj.transform(srcProj, dstProj, UTM_X, UTM_Y)は、UTM zone 11の(x,y)座標を、WGS84の経度緯度に変換する方法です。
18行目の、lond2,latd2,invAngle = geod.fwd(lond, latd, angle, distance)は、fwd methodを使って、WGS84の経度緯度lond, latdから(angle, distance)の変数より経度緯度座標を計算する方法です。
次に、スタート → プログラム → Python 2.7 → IDLE(Python GUI)でShellを動かて、メニューから File → Open で先ほどのpyproj-example.pyを読み込みこむと、
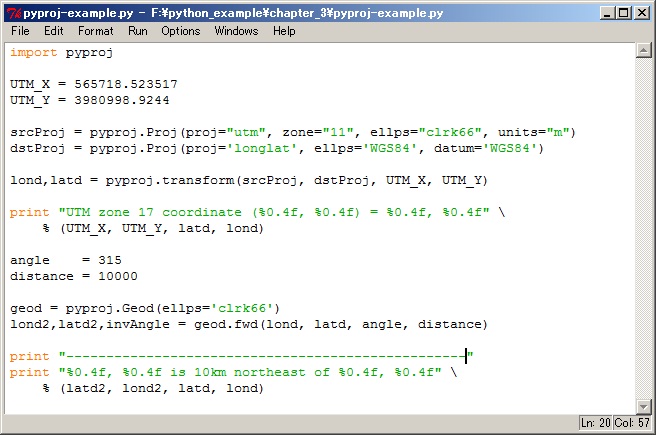
な感じでfile openされます。
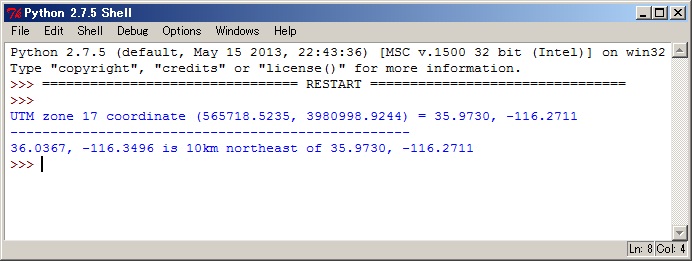
後は、F5 keyを押すか、メニューからRUN → Run Moduleで実行できます。
な感じで座標値の変換結果が表示されます。
とりあえずは問題ないようですね。
後、libraryに何が含まれているかは、helpコマンドでみることができます。
たとえば、pyprojのlibraryのclass構成などが表示されて、
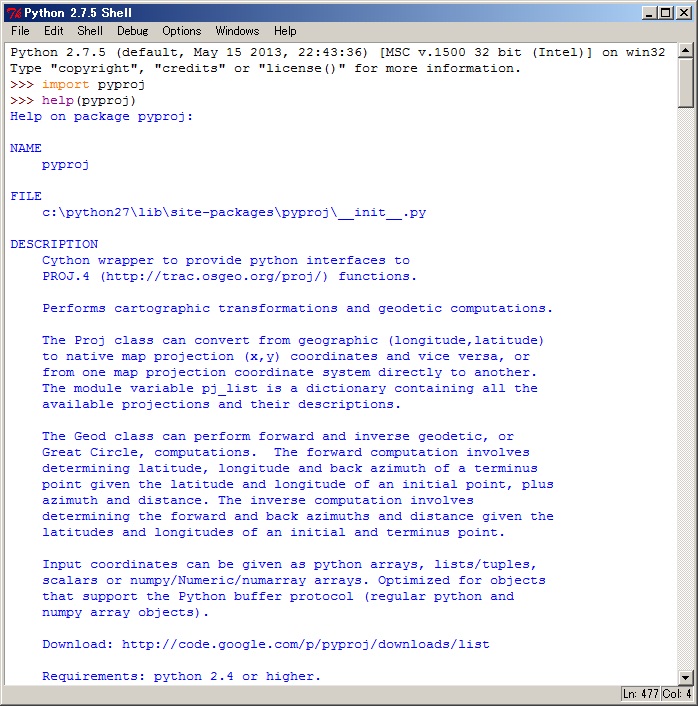
な感じで使うことができます。ただし、最初にLibraryをimport pyprojが必要です。
今回のまとめ
今回は、Python GUI Shellを使って、超~~簡単なpyprojのexampleを作成しました。
このProjrctionはGISでは非常に重要で基本的なものです。測地系や座標系については、別途学習しておいてください。
次回は、PythonでGeoSpatial dataの超~~簡単な解析と操作について学んでいきます。
また、本tutorialは、Python Scriptの基本的なことはある程度理解している前提で今後も話を進めていきます。また、誤字、脱字、spell間違いや勘違いや翻訳間違いなど多々出てくると考えられます。
それは違うじゃん!!とかいろんな意見をいただければと思います。
そこんところ ヨロシク~~!!

最近のコメント