OpenLayersを使ってみる。[Chapter 20]
OpenLayersのControl Classについて[Chapter 19] に引き続き、OpenLayersのControl Subclassについての基本を学んでおきます。
OpenLayers 2.10 Beginner's Guideなる書籍の章立てにあわせて、OpenLayersの使い方を学んでいきます。
OpenLayer.Control Subclass
非常に多くのSubclassがありますが、ここでは主なSubclassと非推奨以外のSubclassを学んでいきます。
OpenLayers Controlについての詳細は、OpenLayers.Control を参考にしてください。
OpenLayers.Control.ArgParser
ArgParser controlは、defaultでmapに追加されています。それは、URL経由で渡された引数を解析します。
たとえば、変数(?zoom=0&lat=0&lon=0&layers= B)をmapのURLに追加するとき、ArgParser controlを解析しています。
Example Call: var argparser_control = new OpenLayers.Control.ArgParser();
OpenLayers.Control.Permalink
Permalink controlはmapの右下にHTMLのlink elementを作成します。Linkは、mapの経度、緯度、zoom値、layerの情報などを含んでいます。
Example Call: var permalink_control = new OpenLayers.Control.Permalink();
Permalinkを使うときは、ArgParser controlは自動的にmapに追加されます。
OpenLayers.Control.Attribution
Attribution controlはmap上にlayerの出典を表示します。
Layerの出典は、このcontrolを使用して地図上に表示される文字列です。
また、各Layerの出典をseparator propertyを設定することで、区切り文字を指定することができます。
このcontrolを使うには、出典を表示したいlayer propertyを指定する必要があります。
Attribution properties
| Name | Type | Description | Default Value |
|---|---|---|---|
| separator | {String} | Separator used between layer attribution text. | ', ' |
| div | {HTML Element} | HTML Element to place this control in.Example:document.getElementById('map_control_div'); |
Using Attributios example code
Attributionを使ったexample codeは、以下のcodeを入力します。
保存先は、c:¥ms4w¥apache¥htdocs¥openlayers2_12¥chapter6¥にしておきます。
ファイル名は、chapter6_ex3_attributions.htmlで保存します。
[html]
<!DOCTYPE html>
<html lang=’ja’>
<head>
<meta charset=’utf-8′ />
<script type=’text/javascript’ src=’http://localhost/openlayers/OpenLayers.js’></script>
<script type=’text/javascript’>
var map;
function init() {
map = new OpenLayers.Map(‘map_element’, {});
//Create a base layer
var wms_base = new OpenLayers.Layer.WMS(
‘OpenLayers WMS’,
‘http://vmap0.tiles.osgeo.org/wms/vmap0′, {
layers : ‘basic’
}, {
attribution : ‘Base WMS layer’
});
/* Setup our two layer objects */
var wms_state_lines = new OpenLayers.Layer.WMS(
‘State Line Layer’,
‘http://vmap0.tiles.osgeo.org/wms/vmap0′, {
layers : ‘stateboundary’
}, {
attribution : ‘State Boundary’,
isBaseLayer : false,
opacity : .2
});
//map.addControl(new OpenLayers.Control.ArgParser());
map.addLayers([wms_base, wms_state_lines]);
if (!map.getCenter()) {
map.zoomToMaxExtent();
}
}
</script>
</head>
<body onload=’init();’>
<div id=’map_element’ style=’width: 500px; height: 500px;’></div>
</body>
</html>
[/html]
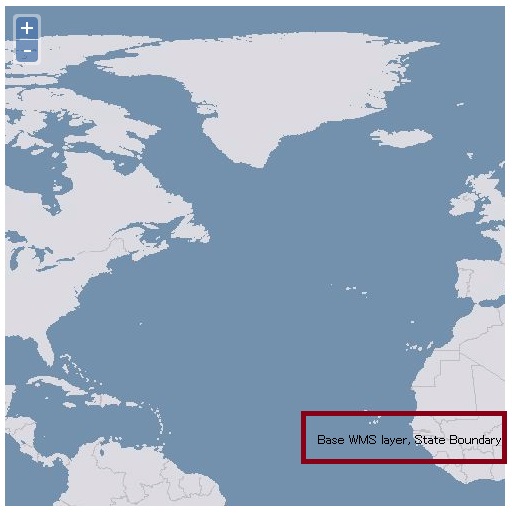
上記codeで、WMSを作成時に、attribution : 'Base WMS layer'とattribution : 'State Boundary'を追加しています。
保存後、FireFoxを立ち上げて、http://localhost/openlayers2_12/chapter6/chapter6_ex3_attributions.htmlと入力して、FireFoxを開いくと

な感じでbrowser上にattributionが表示されます。
OpenLayers.Control.EditingToolbar
EditingToolbar controlについては、別の章で詳しく説明します。
OpenLayers.Control.Graticule
Graticule contorolは、経度緯度線をmap上に描画するcontrolです。
また、propertyを設定する必要があります。
Graticule properties
| Name | Type | Description | Default Value |
|---|---|---|---|
| intervals | {Float{Array}} | An array of floats of possible graticule widths, in degrees. The different widths will be used depending on the current map zoom levels. Example: intervals:[50,30,15,7,4,2,1,.5] | refer to next table |
| displayInLayerSwitcher | {Boolean} | If set to true, the graticule control will be displayed in the layer switcher. | true |
| visible | {Boolean} | Determines if the graticule control should be visible or not. | true |
| numPoints | {Integer} | Specifies the number of points to use in each of the graticule lines. | 50 |
| targetSize | {Integer} | Determines the maximum size of the grid in pixels on the map. | 200 |
| layerName | {String} | Specifies the layer name that will be displayed in the LayerSwitcher control. | null |
| labeled | {Boolean} | Determines if the graticule lines should be labeled. | true |
| labelFormat | {String} | The format of the coordinates the labels will display in. Possible values, for example, would be'd','dm', or 'dms', which represent 'degree', 'minutes', and 'seconds', which determine how precise the coordinates will be displayed in. | 'dm' |
| lineSymbolizer | {Symbolizer} | Specifies the symbolizer to be used to render the lines. A symbolizer specifies style information. In Chapter 10, we will discuss symbolizers and how to use them in detail. | |
| labelSymbolizer | {Symbolizer} | The symbolizer used to render labels, which controls the label style. Chapter 10 discusses symbolizers (objects that define style) in detail. |
| intervals Default Value |
|---|
| [45,30,20,10,5,2,1,0.5,0.2,0.1,0.05,0.01,0.005,0.002,0.001] |
Using Graticule example code
Graticuleを使ったexample codeは、以下のcodeを入力します。
保存先は、c:¥ms4w¥apache¥htdocs¥openlayers2_12¥chapter6¥にしておきます。
ファイル名は、chapter6_ex4_graticule.htmlで保存します。
[html]
<!DOCTYPE html>
<html lang=’ja’>
<head>
<meta charset=’utf-8′ />
<script type=’text/javascript’ src=’http://localhost/openlayers/OpenLayers.js’></script>
<script type=’text/javascript’>
var map;
function init() {
map = new OpenLayers.Map(‘map_element’, {});
//Create a base layer
var wms_base = new OpenLayers.Layer.WMS(
‘OpenLayers WMS’,
‘http://vmap0.tiles.osgeo.org/wms/vmap0′,
{layers: ‘basic’},
{attribution: ‘test’}
);
map.addLayers([wms_base]);
//Add a control to the map
map.addControl(new OpenLayers.Control.Graticule({
intervals: [50,30,15,7,4,2,1,.5],
labelled: true,
}));
//map.addControl(new OpenLayers.Control.MousePosition({
//}));
if(!map.getCenter()){
map.zoomToMaxExtent();
}
}
</script>
</head>
<body onload=’init();’>
<div id=’map_element’ style=’width: 500px; height: 500px;’></div>
<div id=’test’></div>
</body>
</html>
[/html]
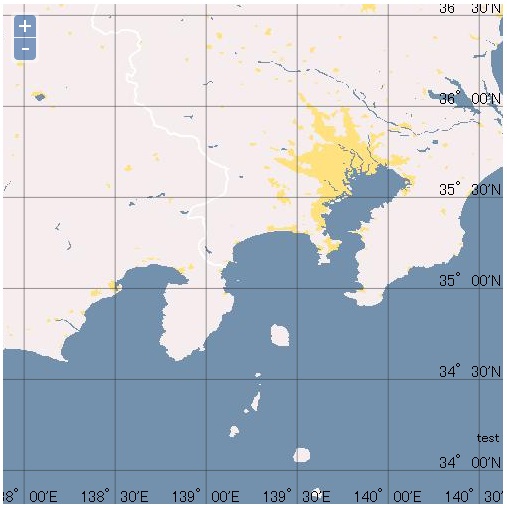
上記codeで、map.addControl(…);でGraticuleを設定しています。
保存後、FireFoxを立ち上げて、http://localhost/openlayers2_12/chapter6/chapter6_ex4_graticule.htmlと入力して、FireFoxを開いくと

な感じでbrowser上にgraticule exampleが表示されます。
OpenLayers.Control.KeyboardDefaults
KeyboardDefaults controlはkeybordから移動や拡大縮小を操作するためのcontrolです。
これは、propertyを設定します。
KeyboardDefaults properties
| Name | Type | Description | Default Value |
|---|---|---|---|
| slideFactor | {Integer} | Sets the amount of pixels to slide the map by. | 75 |
OpenLayers.Control.LayerSwitcher
LayerSwitcher controlは、map上のlayer表示のon/offを切り替えることができます。また、HTML Elementのpropertyを設定することができます。
LayerSwitcher properties
| Name | Type | Description | Default Value |
|---|---|---|---|
| ascending | {Boolean} | Changes the order the layers are displayed. | true |
| roundedCorner | {Boolean} | Specifies if rounded corners should be created for the layer switcher window. | true |
| div | {HTML Element} | If specified, the HTML Element to place this control in. If you use this, you should set the roundedCorner property to false, otherwise, rounded corners will be created inside the target div. Example: document.getElementById('map_control_div'); | null |
LayerSwitcher functions
LayerSwitcher controlは手動で、表示と非表示に切り替える機能を持っています。
-
minimizeControl():がcallされた時は、最小化されます。これは、program内でLayerSwitcher controlを非表示する場合に使います。
-
maximizeControl():はminimizeControl()の反対の機能を持っています。
今回のまとめ
OpenLayersによるControl Subclassの基本について学びました。
sample code の値を変えてcontrol類の挙動について確認しておけば良いですね。
次回は、引き続きOpenLayers Control Subclassの詳細その2について学んでいきます。
また、本tutorialは、htmlやCSSやJavaScriptの基本的なことはある程度理解している前提で今後も話を進めていきます。また、誤字、脱字、spell間違いや勘違いも多々出てくると考えられます。
それは違うじゃん!!とかいろんな意見をいただければと思います。
そこんところ ヨロシク~~!!

最近のコメント