GeoExt1.1を使ってみる。[Chapter 8]
今回は、GeoExtのexampleのToolbar with Actionsを使ってtoolbarにメニューを作成して、eventをActionで追加してみます。
セットアップと入手については、GeoExt1.1 [Chapter 1] を参考にしてください。
GeoExt.Actionについて
まずは、GeoExt.Actionを見ておいてください。
GeoExt.ActionはOpenLayersのContorol類を追加するものです。
基本的な使い方は、
var action = new GeoExt.Action({
    text: "max extent",
    control: new OpenLayers.Control.ZoomToMaxExtent(),
    map: map
});
var toolbar = new Ext.Toolbar([action]);
な感じで使います。
基本的には、Ext.Actionに従います。
OpenLayersのControlが使えるので、わざわざfunction()を書かなくて良い分、codeもすっきりします。
では、exampleを手本にJavaScriptを書いてみましょう。
Toolbar with Action
まずは、例としてOpenLayers.ControlのZoomtoextentのAction定義は、
// ZoomToMaxExtent control, a "button" control
action = new GeoExt.Action({
text : "max extent",
control : new OpenLayers.Control.ZoomToMaxExtent(),
map : map,
tooltip : "全体を表示する。"
});
actions["max_extent"] = action;
toolbarItems.push(action);
toolbarItems.push("-");
な感じになります。
流れとしては、
-
action objectを作成して、
-
propertyをsetして、
-
action[]配列に代入して、
-
toolbarItemsにpush
となります。
toolbarItems.push(”-”);は、separaterとなります。
ExtjsのtoolbarとActionについては、http://extdocs.xenophy.com/で日本語の解説があります。
では、toolbar.jsは、
Ext.onReady(function() {
Ext.QuickTips.init();

// 座標系の設定
var epsg4326 = new OpenLayers.Projection("EPSG:4326");
var epsg3857 = new OpenLayers.Projection("EPSG:3857");
// mapの作成
var map = new OpenLayers.Map();
// openstreetmapの作成
var osmLayer = new OpenLayers.Layer.OSM("OpenStreetMap");

// 電子国土の作成
var webtisLayer = new webtis.Layer.BaseMap("電子国土");

var vectorLayer = new OpenLayers.Layer.Vector("作図Layer");
map.addLayers([osmLayer, webtisLayer, vectorLayer]);

// controlの設定
map.addControl(new OpenLayers.Control.MousePosition());
map.addControl(new OpenLayers.Control.ScaleLine());
map.addControl(new OpenLayers.Control.LayerSwitcher());
map.addControl(new OpenLayers.Control.MousePosition());

// 初期表示の緯度経度
var zoomlevel = 10;
var initLon = 139.5;
var initLat = 35.5
map.setCenter(new OpenLayers.LonLat(initLon, initLat).transform(epsg4326,
epsg3857), zoomlevel);

// actionの設定
var ctrl, toolbarItems = [], action, actions = {};

// ZoomToMaxExtent control, a "button" control
action = new GeoExt.Action({
text : "max extent",
control : new OpenLayers.Control.ZoomToMaxExtent(),
map : map,
tooltip : "全体を表示する。"
});
actions["max_extent"] = action;
toolbarItems.push(action);
toolbarItems.push("-");

// Navigation control and DrawFeature controls
// in the same toggle group
action = new GeoExt.Action({
text : "nav",
control : new OpenLayers.Control.Navigation(),
map : map,
// button options
toggleGroup : "draw",
allowDepress : false,
pressed : true,
tooltip : "ナビゲーション",
// check item options
group : "draw",
checked : true
});
actions["nav"] = action;
toolbarItems.push(action);

action = new GeoExt.Action({
text : "draw point",
control : new OpenLayers.Control.DrawFeature(vectorLayer,
OpenLayers.Handler.Point),
map : map,
// button options
toggleGroup : "draw",
allowDepress : false,
tooltip : "ポイントを描く。",
// check item options
group : "draw"
});
actions["draw_point"] = action;
toolbarItems.push(action);

action = new GeoExt.Action({
text : "draw poly",
control : new OpenLayers.Control.DrawFeature(vectorLayer,
OpenLayers.Handler.Polygon),
map : map,
// button options
toggleGroup : "draw",
allowDepress : false,
tooltip : "ポリゴンを描く。",
// check item options
group : "draw"
});
actions["draw_poly"] = action;
toolbarItems.push(action);

action = new GeoExt.Action({
text : "draw line",
control : new OpenLayers.Control.DrawFeature(vectorLayer,
OpenLayers.Handler.Path),
map : map,
// button options
toggleGroup : "draw",
allowDepress : false,
tooltip : "ラインを描く。",
// check item options
group : "draw"
});
actions["draw_line"] = action;
toolbarItems.push(action);
toolbarItems.push("-");

// SelectFeature control, a "toggle" control
action = new GeoExt.Action({
text : "select",
control : new OpenLayers.Control.SelectFeature(vectorLayer, {
type : OpenLayers.Control.TYPE_TOGGLE,
hover : true
}),
map : map,
// button options
enableToggle : true,
tooltip : "図形を選択する。"
});
actions["select"] = action;
toolbarItems.push(action);
toolbarItems.push("-");

// Navigation history - two "button" controls
ctrl = new OpenLayers.Control.NavigationHistory();
map.addControl(ctrl);

action = new GeoExt.Action({
text : "previous",
control : ctrl.previous,
disabled : true,
tooltip : "前の表示状態に戻る。"
});
actions["previous"] = action;
toolbarItems.push(action);

action = new GeoExt.Action({
text : "next",
control : ctrl.next,
disabled : true,
tooltip : "次の表示状態に進む。"
});
actions["next"] = action;
toolbarItems.push(action);
toolbarItems.push("-");
toolbarItems.push("->");

// Reuse the GeoExt.Action objects created above
// as menu items
toolbarItems.push({
text : "menu",
menu : new Ext.menu.Menu({
items : [
	// ZoomToMaxExtent
	actions["max_extent"],
	// Nav
	new Ext.menu.CheckItem(actions["nav"]),
	// Draw point
	new Ext.menu.CheckItem(actions["draw_point"]),
	// Draw poly
	new Ext.menu.CheckItem(actions["draw_poly"]),
	// Draw line
	new Ext.menu.CheckItem(actions["draw_line"]),
	// Select control
	new Ext.menu.CheckItem(actions["select"]),
	// Navigation history control
	actions["previous"], actions["next"]]
})
});

// mapPanelの作成
var mapPanel = new GeoExt.MapPanel({
region : "center",
map : map,
zoom : zoomlevel,
layers : [osmLayer, webtisLayer, vectorLayer],
tbar : toolbarItems
});

// viewportのcenterに表示
var win = new Ext.Viewport({
regin : 'center',
title : 'Map Window',
closable : true,
plain : true,
layout : 'border',
items : [mapPanel]
});

});
codeが長いですが、やっていることは、たくさんのActionの定義をしているためです。
処理としては、
-
表示するmapの作成(Baselayerは、OpenStreetMapと電子国土)
-
描画するvector layerの作成
-
Actionの定義
-
menuの作成
-
mapPanelの作成
-
viewportの作成
の流れです。
codeのtoggleGroup : “draw”は、グループ化して選択できる項目を一つにする場合使います。
htmlファイルは今までのものを参考にしてもらって、
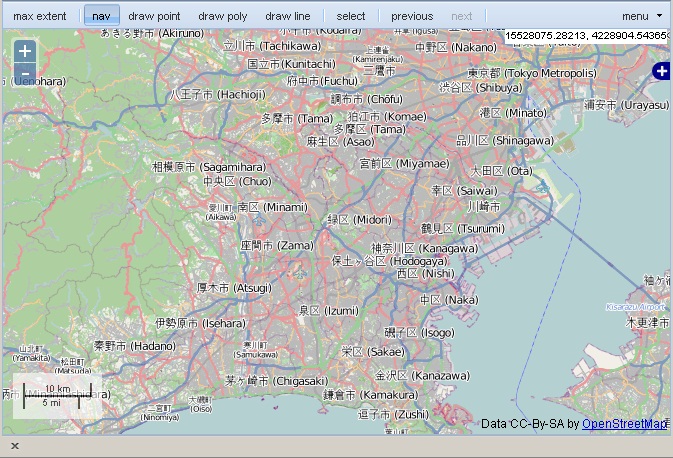
FireFoxで実行すると、

な感じ、browser画面全体に表示されます。
な感じで、mouse overでtooltipsが表示されます。
このtooltipsは、Ext.QuickTips.init();で行います。
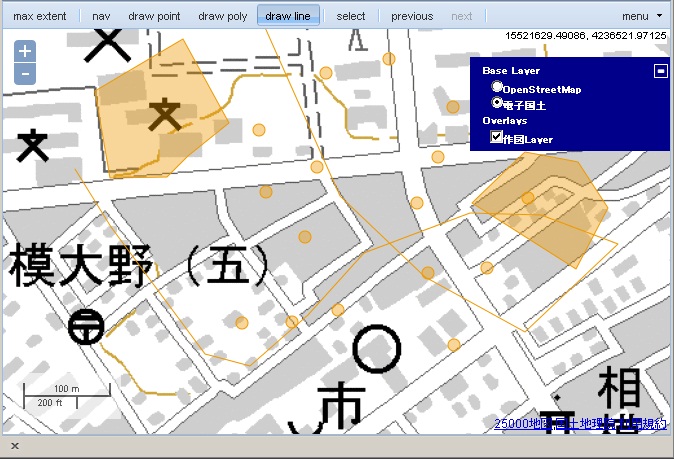
な感じで、polygon,line,pointを書くことができます。
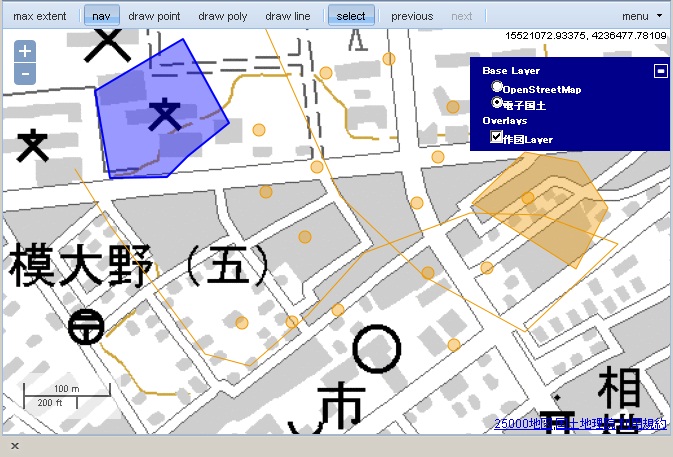
そして、selectでvector layer上のfeatureを選択することができます。

な感じで、選択したfeatureがblueに変わっています。
今回のまとめ
GeoExt.ActionとToolbar,OpenLayers.controlを使ってActionを追加しました。
これを応用して、ほかのcontrol類のActionの定義をしたり、menuにiconを付けたりなどの追加もできるようになります。
次回は、treeActionの操作、tree action exampleにtryしてみます。


Comments are closed.